As this year comes to a close, I’m sure the thought of next year has already crossed your mind. What do you want to leave behind in 2025? What new goals can you aspire for in the new year? One of my favourite ways to put pen to paper, is to create a vision board where I can easily see what next year might look like. Whether you choose to create a goal-specific page or an aspirational mood board, I’ll be exploring different methods to use washi tape in your vision board.
Goals and gather

The first step of creating a vision board is to look for inspiration. Let this be an opportunity for you to reflect back on your year and look forward to next year’s you. Is there anything that you aspire to or would like to achieve? Are there any goals you could improve on or try again?
Once you’ve compiled your list of goals and aspirations, you can translate these into visual means by gathering images or cutting out paper scraps to represent these things. I like to collect a mixture of images - some that indicate a specific goal and some that evoke a feeling I aspire to and some images that I love from the current year.
Header and background

With any vision board, it’s good to start with the base and the focal point. Your background should be the first element on your page as it will be the foundation of your vision board and be a guide on where everything else is positioned later on. An easy way to make a background is to use patterned washi tape - not only is it adhesive and ready to be stuck down but it comes in a multitude of vibrant patterns to match your aesthetic.
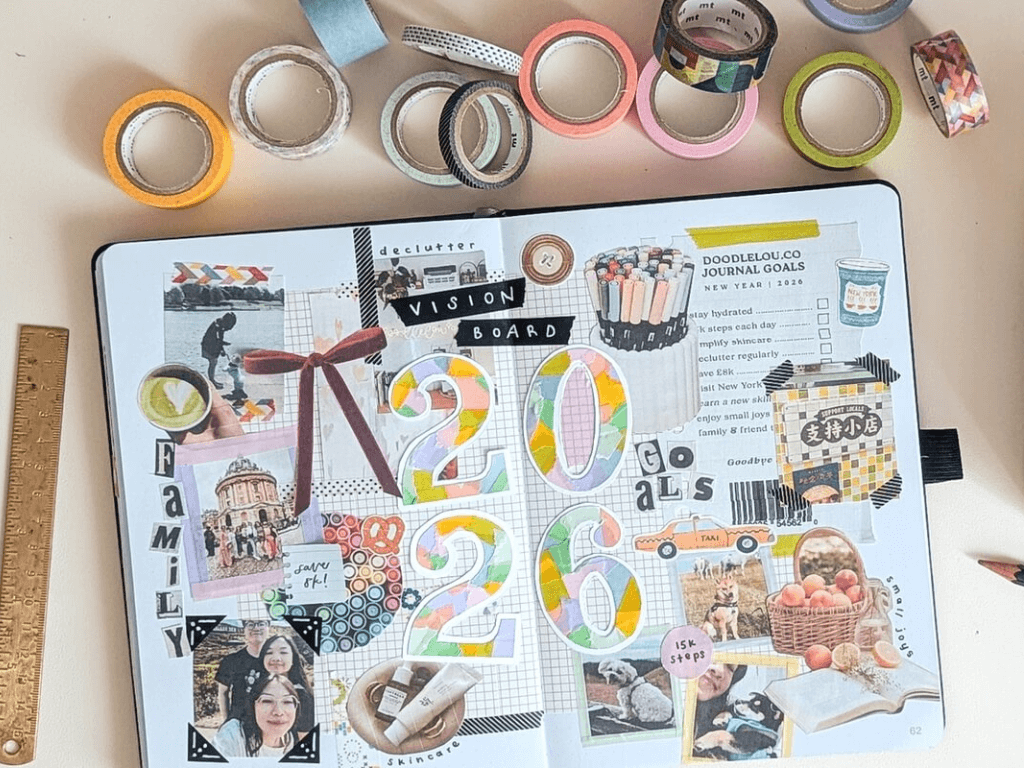
To make my header, I’ve sketched out the numbers ‘2026’ on paper and layered them with different colours of washi tape. I then cut out the individual numbers and pasted them on white paper so they’d have a slim border and stand out on the page. I’ve also ripped two pieces of black washi tape to write my subheading on later. These two titular elements will be stuck on last so they are at the forefront of my vision board.
Layout and aesthetic

Once you’ve gathered your desired clippings and photos, let’s put it to paper. Grab your canvas (I’m using my journal) and start placing your images into a rough layout. Make sure you think about leaving space for your headers, annotations or doodles that you might want to include after. This is also a great point to dig out all of your crafty materials like washi tape, paper scraps and stickers so you can begin developing the colours and style of your vision board - I’ve decided to create an effortless scrapbook-style aesthetic.
Borders with washi tape

If you’re happy with your placement, you can go ahead and stick them down with glue, sticky tape or washi tape. To really make your images pop, use your washi tapes to their full advantage. For a vision board, I love to use mt Masking Tape’s slim washi tapes (3mm) so they can be made into simple but effective frames. If your washi tape comes in the standard 15mm thickness, simply cut them in half by the length to achieve the same result to suit the proportion of your smaller images.
- Rip the edge of your washi tape and stick them on each corner of your photo or above and below to achieve an effortless scrapbook look
- Cut the edge of your washi tape with scissors for clean lines and mix and match the colours to make simple square borders
- Cut your washi tape into a square and then in half to make a triangle and doodle straight on the washi tape to make quick and easy photo corners
Detail and decorate

All that’s left to do now is to add your final details in. More is more - add stickers and washi tapes to fill in any sparse areas or to soften harsh paper edges or to add an extra pop of colour. If there are extra images that you decide you want to layer into your design, the washi tape is removable so it can easily be peeled back and stuck back in place. I like to integrate the goals that I’ve set in playful writing around my vision board or by cutting washi tape in shapes to make faux stickers and writing directly on there so I can be gently reminded of them.