Mother's Day is just around the corner, and if you're anything like us, you'd rather make something heartfelt than grab a generic card off the shelf. The good news? This one is genuinely easy — and the result looks impressively beautiful.
All you need is a little mt Masking Tape, some scissors, and about 20 minutes. We'll guide you through making a washi tape flower bouquet card that's colourful, charming, and completely handmade with love. Mum is going to adore it.
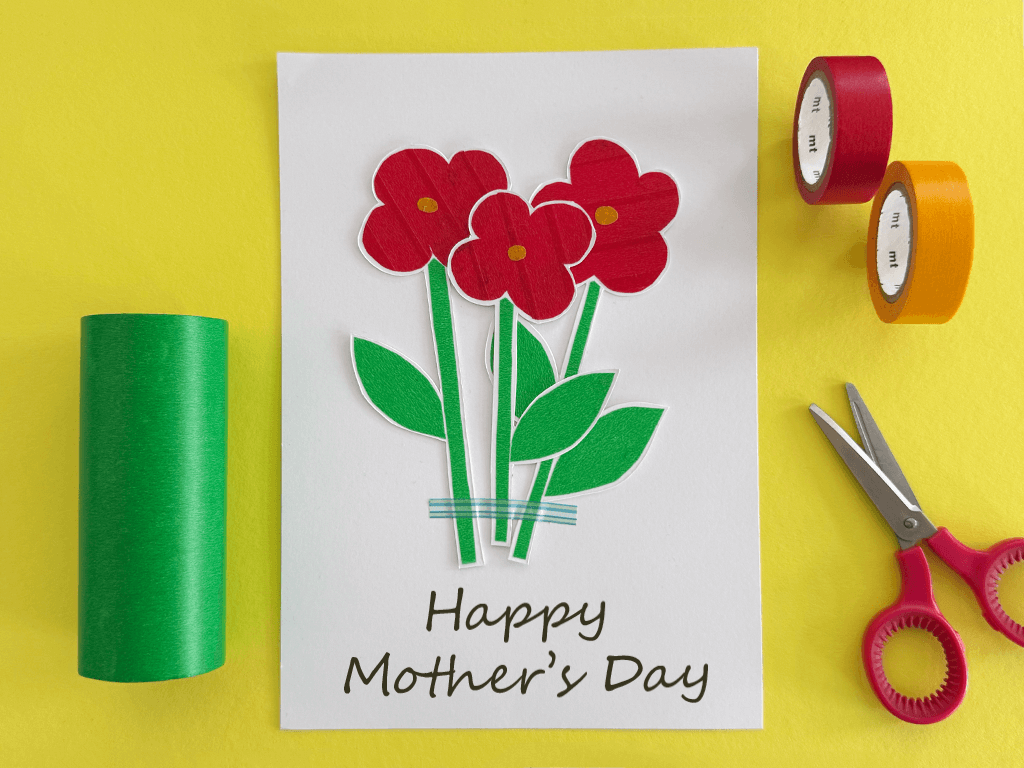
What You'll Need
• Rolls of mt Masking Tape — a red roll for the petals, plus a green tape for the stems and leaves, and a yellow for the pistil.
• Baking paper
• Thick paper or card stock for the background
• A pen or fine liner
• Scissors
• A blank card — white or kraft both look lovely
Step 1: Make Your Washi Tape Flowers
This is where the magic starts — and it's easier than it looks, we promise!
1. Stick your washi tape onto baking paper. Lay a few strips flat onto the parchment paper. This gives you a workable surface without the tape sticking to itself.
2. Draw your flower shapes on the back. Flip the parchment over and use a pen to draw simple flower outlines on the back of the tape. Think classic five-petal flowers — no need to be a skilled artist! The simpler, the sweeter.
3. Cut them out. Carefully cut around each flower shape. You should end up with delicate little washi tape petals that hold their form beautifully.
4. Add stems, leaves and a pistil. Using your green tape (also stuck onto parchment first), cut out simple leaf and stem shapes. Then cut a tiny yellow dot from your yellow tape — this will be the pistil (the centre of the flower). Cute, right?
Step 2: Mount the Flowers
Now let's give your blooms a proper home.
5. Stick the flowers onto thick paper. Peel your washi tape flowers from the parchment and press them gently onto a piece of thick paper or card stock.
6. Cut them out — but leave a thin white border. When you trim around each flower, leave a small white line around the edge. This little detail makes the flowers pop and gives your bouquet that extra handcrafted feel.
Step 3: Build Your Bouquet on the Card
Time to bring the whole thing together — this is the really satisfying bit.
7. Arrange and stick your bouquet. Lay your stems, leaves, and blooms onto the front of your card and play around with the arrangement before you commit — a loose, natural bunch looks wonderfully charming. Then, once you’re happy with the bouquet, wrap a strip of slim washi tape horizontally across the stems to hold them together. This is one of our favourite details: it acts like a little ribbon or twine, and because it’s washi, it adds an extra pop of colour and pattern right at the heart of the design.
8. Add a message on the front. Pick up your pen and write a little note on the front of the card — something like "Happy Mother's Day" or "For you, Mum" works beautifully alongside the flowers.
Step 4: The Grand Finale — Write Your Message Inside
Your card is ready! Now for the most important part — pop it open and write something that comes straight from the heart. Tell her why she's wonderful. Make her laugh. Make her cry happy tears. That's the whole point of handmade, after all.
Slip it in an envelope, maybe tie it to a bunch of real flowers or a little gift, and you've got something truly special on your hands.
We'd love to see yours! Share your Mother's Day cards with us on Instagram @mtmaskingtape_uk using #mtLOVES - we repost our favourites and there are always plenty of them around Mother's Day!
Happy crafting! 🌸